


Written by Andrew Marshall
UK parent of three sharing practical advice to help families enjoy camping, walking, garden play, and simple outdoor adventures across the UK.
Creator of Simple Days Outside.
Coming home from a great camping trip often means returning with damp gear — especially in the UK, where even a sunny weekend can end with morning dew, condensation inside the tent, or rain during pack-up. If wet equipment is left packed away, it can quickly develop mildew, unpleasant smells, and even permanent fabric damage.
Drying everything properly after a trip is one of the most important habits experienced campers learn. Tents, sleeping bags, clothing, and other gear often need time and airflow to dry thoroughly, and rushing the process can shorten the life of expensive equipment.
Once you get home, drying damp camping gear quickly is important to prevent mildew and musty smells. Tents, clothing and sleeping bags often need a full day to air out properly. If the weather isn’t cooperating, simple techniques for drying clothes and fabrics indoors without causing damp can make a big difference.
This guide forms part of our wider collection of family camping advice and practical UK short-trip guides, designed to help parents enjoy simple outdoor adventures without unnecessary stress.
This article explains the most effective ways to dry a tent and camping equipment in typical UK conditions, whether you have sunshine, overcast weather, or need to dry things indoors.
👉 In This Guide
Why Drying Camping Gear Properly Matters
Damp camping equipment can cause several problems if it isn’t dried thoroughly.
Mould and mildew are the biggest risks. Once mildew forms on a tent or sleeping bag, it can permanently stain fabric and create unpleasant smells that are difficult to remove.
Moisture can also damage:
- Waterproof coatings
- Tent seams
- Insulation in sleeping bags
- Metal components like poles and pegs
Even if gear only feels slightly damp, packing it away in a sealed bag or storage box can trap moisture for days or weeks.
The goal isn’t just to dry the surface — it’s to remove moisture completely.
First: Separate “Wet” From “Dirty” (It Makes Drying Much Easier)
Before you start drying, do a quick 3-minute sort:
- Wet but clean: tent flysheet, inner tent (usually condensation), sleeping bags, towels
- Wet and dirty: groundsheet, pegs, guy lines, muddy clothes, boots
- Spills / stains: sap, food, bird mess, sunscreen marks
This helps because dirt holds moisture and creates odours. If you dry muddy fabric without rinsing or wiping it first, you often end up with a musty tent that smells worse the next time you open it.
A simple wipe with a damp cloth (and a second cloth to dry the area) is usually enough before you hang things up.
The Best Way to Dry a Tent (If the Weather Is Good)
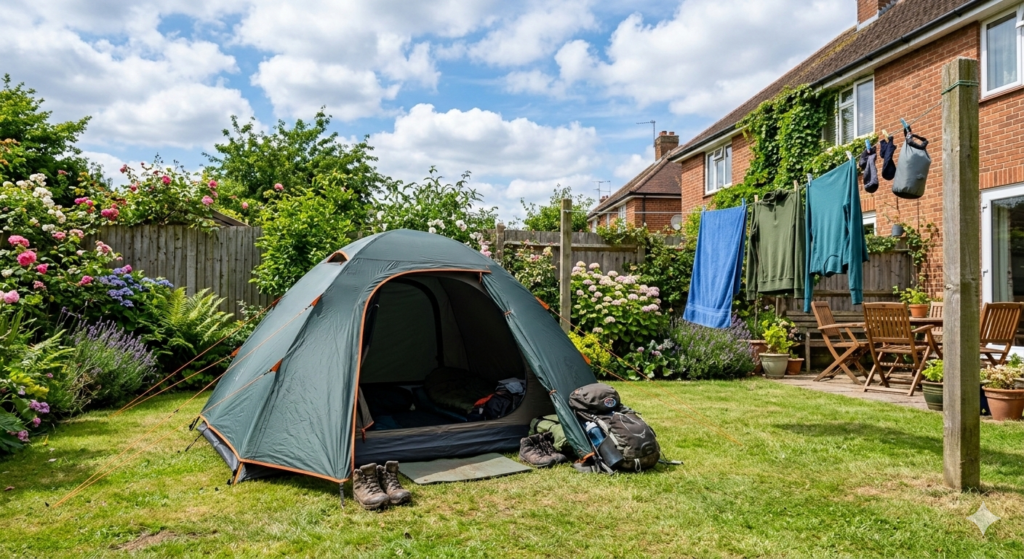
The easiest and most effective solution is simply using fresh air and space.
Set the Tent Up Again at Home
If you have access to a garden or outdoor space, the best method is to pitch the tent again after your trip.
Larger family tents can take a little longer to dry because there’s simply more fabric and space for moisture to hide.
This allows:
- Full airflow through the fabric
- Sunlight to help evaporate moisture
- Ground sheets and seams to dry properly
Even a few hours outside can remove most of the moisture that builds up during camping.
Author Insight
One thing I always do after a camping trip is set the tent up in the garden if the weather is nice. Even when it looks dry, there’s often hidden dampness from condensation or morning dew. Leaving the tent pitched for an afternoon lets everything air out properly and avoids that musty smell the next time you open the bag.
If the tent was particularly wet, leaving it up for most of the day is ideal.
Condensation vs Rain: What You’re Drying Changes the Plan
Most UK tents aren’t “soaked” from rain — they’re damp from condensation.
- Condensation damp (inner tent): usually dries quickly with airflow
- Rain-soaked flysheet: needs longer drying time and extra attention to seams and corners
- Damp groundsheet: often the slowest to dry and the biggest source of smells
If your tent was only lightly damp from condensation, pitching it for a couple of hours is often enough. If it was wet from rain, aim for a full afternoon and check the seams before packing away.
Drying a Tent Without a Garden
Not everyone has outdoor space to pitch a tent at home. Fortunately, there are still effective alternatives.
Use a Washing Line
If the tent is small enough, you can drape sections of it over a washing line.
Spread the material out rather than folding it over itself. The goal is maximum airflow.
Rotate sections every hour or so to expose damp areas.
Use a Balcony or Railings
Urban campers often dry gear using:
- Balcony railings
- Decking
- Garden fences
Just make sure fabric isn’t pressed tightly against surfaces.
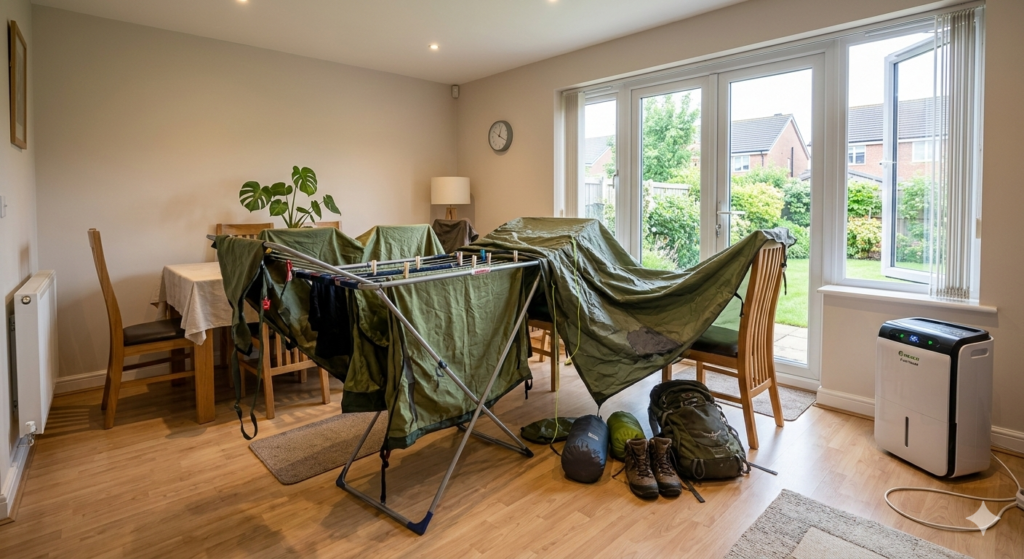
Drying a Tent Indoors
Sometimes the weather simply refuses to cooperate. In these situations you can dry camping gear indoors, but ventilation is essential.
Use a Spare Room or Garage
The easiest indoor drying space is:
- A spare room
- Garage
- Utility room
- Conservatory
Spread the tent fabric across chairs, racks, or airers. Keep fabric away from radiators and direct heat sources — gentle airflow dries best and protects coatings.
Try to avoid placing it directly on floors where moisture may stay trapped.
Open Windows for Airflow
Air circulation is crucial.
Opening a window helps remove moisture from the room rather than allowing it to build up.
If you’re drying large wet fabrics inside, managing moisture properly becomes important to prevent condensation forming around the house.
If you have one, a dehumidifier can speed up the process dramatically.
Quick UK Tip: Dry Indoors Without Creating Condensation
If you’re drying big wet fabric indoors, do two things:
- Ventilate: crack a window (even slightly) to let moisture escape
- Control moisture: run a dehumidifier if you have one
If you can’t ventilate well, dry in smaller batches (flysheet first, then inner). It keeps the room comfortable and avoids damp patches on walls or windows.
How to Dry a Wet Groundsheet
Groundsheets often remain damp longer than the tent itself.
To dry them properly:
- Shake off dirt and debris
- Wipe excess moisture with a towel
- Hang or spread flat
Groundsheets dry fastest when laid flat in sunlight.
Avoid folding them while damp — this traps moisture inside the layers.
Drying Sleeping Bags After Camping
Sleeping bags often absorb moisture from:
- Body heat
- Condensation
- Overnight humidity
Even if they feel dry, they benefit from airing out.
Best Method
Hang the sleeping bag over:
- A clothes airer
- A stair rail
- A washing line
Unzip it fully so air can circulate through the insulation.
Synthetic bags usually dry faster than down sleeping bags.
Drying Wet Camping Clothes
Camping clothes can often be dried in the same way as regular laundry, but outdoor fabrics benefit from air drying when possible.
Good drying methods include:
- Clothes airers
- Washing lines
- Heated airers
- Well-ventilated rooms
Avoid storing waterproof jackets or fleeces while even slightly damp.
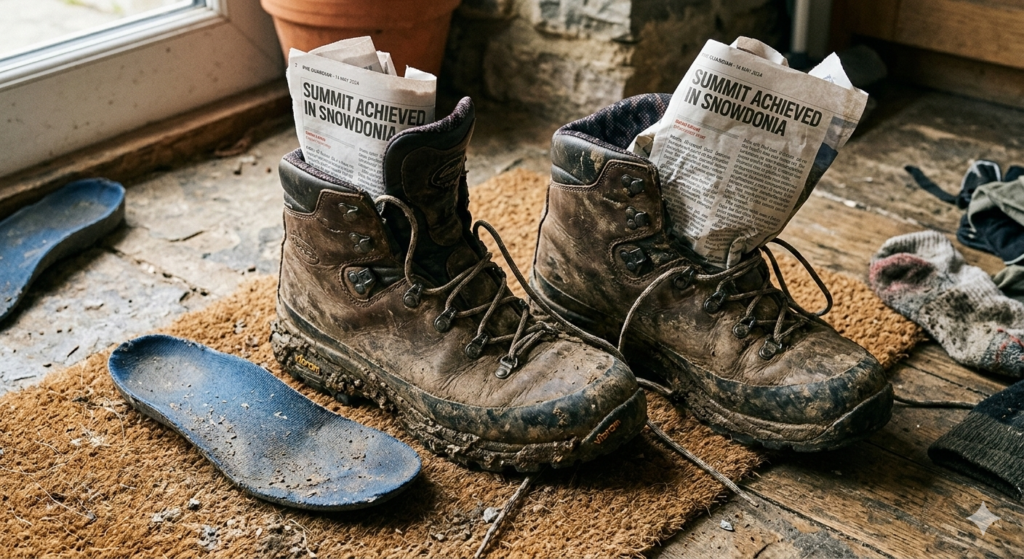
Drying Boots and Outdoor Footwear
Wet boots are common after muddy campsites or rainy hikes.
The safest drying method is:
- Remove insoles
- Loosen laces
- Stuff with newspaper or dry cloth
- Leave near airflow
Avoid placing boots directly next to radiators or heaters, as high heat can damage adhesives and materials.
What NOT to Do When Drying Camping Gear
Some quick fixes can actually damage equipment.
Avoid:
Packing gear away damp
Even slightly damp gear can develop mildew within days.
Using strong heat sources
Radiators, tumble dryers, or fires can damage waterproof coatings.
Leaving gear in bags
Camping bags trap moisture and slow drying dramatically.
If Your Tent Already Smells Musty (Quick Rescue)
If you open the bag and it smells damp, don’t panic — it’s common.
- Pitch or hang the tent immediately for airflow
- Wipe the affected area with warm water and a mild soap solution
- Rinse with a clean damp cloth so you don’t leave residue
- Dry fully (this matters more than the cleaning)
Avoid harsh bleach or strong detergents on waterproof fabrics — they can damage coatings. If stains are persistent, check the tent manufacturer’s cleaning guidance.
How Long Should Camping Gear Dry?
As a rule of thumb:
- Tents: 4–12 hours depending on weather
- Sleeping bags: 6–24 hours
- Groundsheets: 2–6 hours
- Clothing: similar to normal laundry
In UK conditions it’s common for gear to need a full day to dry completely.
A Simple Post-Camping Drying Routine
Many campers follow a basic routine when they get home.
If you’re trying to build a simple routine for family trips, having a clear packing and unpacking checklist for camping gear makes post-trip organisation much easier.
- Empty the car and unpack gear immediately
- Shake dirt and debris from tents and groundsheets
- Pitch the tent or spread fabric out
- Hang sleeping bags and clothing
- Leave everything airing for several hours
Once dry, gear can be repacked and stored without worry.
Storing Camping Gear After Drying
Before storing equipment:
- Make sure fabric feels completely dry
- Loosely pack sleeping bags where possible
- Store tents in breathable bags or containers
- Keep gear in a cool, dry location
Avoid sealed plastic containers unless you’re certain everything is fully dry.
2-Minute Post-Camping Drying Checklist
- Unpack everything as soon as you get home
- Wipe off mud and shake out debris
- Dry the flysheet and groundsheet first
- Air sleeping bags fully unzipped
- Dry boots with insoles out (no direct heat)
- Don’t pack anything away until it’s 100% dry
Final Thoughts
Drying camping gear after a trip might feel like a chore, but it’s one of the easiest ways to protect your equipment and avoid unpleasant surprises next time you head outdoors.
Families new to camping often don’t realise how important drying gear properly is until they open a tent weeks later and find it smelling damp.
In the UK especially, tents and gear often collect hidden moisture even when the weather seems fine. Taking the time to air everything out — whether in the garden, on a washing line, or indoors with good airflow — keeps your gear fresh and ready for the next adventure.
A simple afternoon of drying can prevent mould, eliminate smells, and ensure your tent is just as welcoming the next time you unzip it.
🔗 Related Camping Guides
About The Author – Andrew Marshall
Andrew Marshall is the creator of Simple Days Outside and a UK parent of three who regularly camps, walks, and explores outdoor activities with his family. His guides focus on practical gear, realistic family adventures, and simple ways to help families enjoy the outdoors across the UK. The recommendations on this site are based on real-world use, research, and the kind of equipment families actually rely on for weekend trips and everyday outdoor fun.